Are you experiencing dissatisfaction with your outdated kitchen cabinets but are uncertain about how to transform them without undertaking a complete remodel? Consider integrating elements like a new Moen faucet or upgrading to a Formica laminate countertop for a budget refresh. Spray painting presents a rapid and effective solution for transforming cabinets, providing a polished finish in significantly less time and with minimal mess compared to conventional methods. This guide encompasses all the necessary information regarding the spray painting of kitchen cabinets, including essential tools and materials, comprehensive step-by-step instructions, and expert advice for ensuring a successful project. Prepare to revitalize your kitchen space with efficient work by using the right painting tools and techniques.
Look into: How To Paint UPVC Window Frames
Why Choose Spray Painting Over Traditional Painting Methods?
Spray painting has gained recognition as a preferred alternative to traditional painting methods, offering numerous advantages that are appealing to both professionals and do-it-yourself enthusiasts engaged in a DIY project.
In projects such as transforming kitchen cabinets or refreshing a home’s interior, the use of a paint sprayer, such as the Wagner Flexio 5000, can significantly enhance both the efficiency and quality of the paint application, yielding results that are both cost-effective and aesthetically pleasing. This contemporary technique not only reduces labor time but also delivers a visually appealing finish that can rival that achieved through conventional painting methods.
Furthermore, spray painting can serve as a cost-effective solution for individuals seeking to upgrade their living spaces without incurring excessive expenses, particularly during the festive Christmas holiday season when many individuals consider home improvement projects such as adding new appliances or performing electrical repairs.
Faster And More Efficient
One of the primary advantages of spray painting is its capacity to provide faster and more efficient results compared to traditional painting methods, making it an ideal option for projects with tight deadlines.
When utilizing an HVLP (High Volume Low Pressure) sprayer, the spray painting process becomes further optimized, allowing for better air movement and less waste. The HVLP system minimizes overspray, thereby conserving paint while ensuring a more uniform application that contributes to a smooth finish. This level of efficiency can significantly reduce the overall time required for a project, enabling homeowners or professionals to complete their work with remarkable expediency.
- Faster application: Coverage is achieved significantly quicker than when using brushes or rollers.
- Improved airflow: HVLP technology provides superior control, resulting in less paint wastage.
- Quicker drying: The fine mist generated facilitates rapid drying of layers.
In the context of home improvement, this reduction in drying time is of paramount importance. Increased efficiency not only enhances productivity but also contributes to overall satisfaction with the completed space, whether it involves installing a garbage disposal or tiling backsplash.
Smooth And Professional Finish
Spray painting offers a smooth and professional finish that is often difficult to achieve through traditional methods, thereby ensuring that surfaces such as cabinet doors and drawer faces retain an appealing aesthetic.
The attainment of this level of quality is significantly influenced by various factors, including paint sheen, paint pattern, and the type of paint used, such as a water-based urethane, which plays a crucial role in determining the final appearance. Paint sheen affects both the reflectivity and durability of the finish; options range from matte to high-gloss, each suitable for different environments and applications.
To enhance an already outstanding finish, it is essential to employ proper application techniques. Consider the following recommendations:
- Apply light, even coats when spraying, allowing each layer to dry before applying additional coats.
- Utilize a consistent motion to prevent drips and achieve a uniform texture.
- For minor imperfections, touch-up methods can be highly effective; simply use a fine brush and some leftover paint to blend seamlessly.
By paying attention to these factors, individuals can ensure that their spray-painted surfaces appear flawless and maintain their visual appeal over time, even as trends change or new appliances are added.
Less Mess And Clean-up
Spray painting is preferred for its minimal mess and straightforward clean-up process, facilitating a more efficient and enjoyable painting experience.
To enhance the overall effectiveness of this technique, proper preparation using masking tape, drop cloths, and a tack cloth is essential in minimizing unwanted splatters and overspray. By meticulously taping off edges and covering adjacent areas, individuals can protect their belongings and surfaces from potential paint damage, thereby simplifying the post-project clean-up.
Employing a paint booth offers controlled conditions that can significantly improve the quality of the paint application while allowing you to adjust variables like temperature and humidity levels. These booths not only contain overspray but also assist in maintaining optimal temperature and humidity levels, resulting in a more uniform finish.
Furthermore, wearing protective gear, such as respirators and gloves, during the painting process is crucial for ensuring safety, especially when working with materials like topcoat primer or non-flammable primer. This practice enables individuals to reap the benefits of spray painting while safeguarding their health against harmful fumes and particulate matter.
What Tools And Materials Do You Need For Spray Painting Kitchen Cabinets?
Embarking on a spray painting project to revitalize kitchen cabinets necessitates the use of several essential tools and materials to achieve a successful and polished outcome, such as hand tools for removing doors and cleaning surfaces. For example, utilizing a high-quality spray paint gun, such as the Wagner Flexio 5000, can significantly enhance the efficiency of paint application while ensuring a smooth finish on kitchen cabinets and drawer faces.
Furthermore, proper preparation is vital; therefore, materials such as paint primer, fine-grit sandpaper, and painter’s tape for precise edging should not be overlooked, especially when dealing with Formica laminate surfaces. Investing in these tools not only simplifies the painting process but also contributes to a more professional appearance for the cabinets.
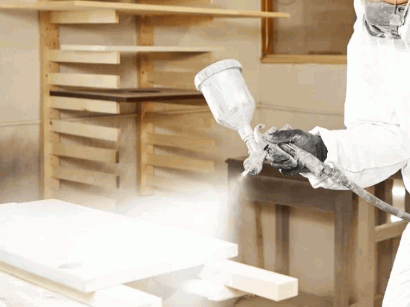
Spray Paint Gun
The spray paint gun is an essential tool for any spray painting project, with models such as the Wagner Flexio 5000 distinguished by their versatility and user-friendliness.
Among the various types of spray paint guns available, High Volume Low Pressure (HVLP) sprayers are particularly esteemed for their efficiency and precision. These sprayers, including the esteemed Wagner Flexio 5000, offer an exceptional balance of paint control and airflow, enabling users to achieve a smooth, even finish with minimal overspray.
A notable feature of HVLP sprayers is the adjustable settings, which allow users to customize the paint flow and spray pattern to meet the specific requirements of their projects. Additionally, the ease of cleaning ensures that maintaining the tool is not a burdensome task, making it an ideal choice for both DIY enthusiasts and professionals.
Key advantages of HVLP sprayers include:
- Efficient paint application
- Customizable spray patterns
- Minimal overspray
- Quick and effortless cleaning
This combination of functionality and user-friendly design positions HVLP sprayers as the preferred option for individuals seeking to enhance their spray painting projects.
Paint Primer
The use of a high-quality paint primer is essential for ensuring optimal adhesion of the paint and achieving a long-lasting finish on surfaces, such as kitchen cabinets.
Selecting the appropriate primer is critical, not only for aesthetic appeal but also for the durability of the paint application, whether it involves kitchen cabinets or other surfaces. When the correct type of primer is chosen, it significantly contributes to enhancing the longevity of the finish and ensures a smooth, uniform application.
Different projects may necessitate specific types of primers; for example, topcoat primers are typically required for surfaces subject to heavy wear, while non-flammable primers are imperative in environments where safety is a priority, particularly when conducting plumbing repairs or electrical repairs. Neglecting this important step can result in complications such as peeling, fading, or chipping of the paint.
Key advantages of using a quality primer include:
- Durable finishes: A proper primer provides a solid foundation for the paint.
- Enhanced color: Primers can influence the vibrancy of the final paint color.
- Improved texture: Correct application can yield a consistently smooth surface, minimizing the need for multiple coats.
Paint Thinner
Paint thinner plays a critical role in the spray painting process, particularly in the cleaning of surfaces and ensuring a smooth application of paint.
When selecting the appropriate paint thinner, it is essential to recognize that different types are designed for various paint formulations and applications, such as latex enamel paint for a budget-friendly paint job. For oil-based paints, mineral spirits are commonly recommended due to their effective ability to dissolve paint while emitting a relatively pleasant odor, perfect for quick touch-up work.
Conversely, water-based paints necessitate a different approach; in this case, water serves as the most effective thinner, facilitating the cleaning of brushes and rollers, making it suitable for use in an airless sprayer. Acetone may also be utilized for its rapid evaporation and efficiency in surface preparation; however, caution is advised due to its potent nature, which may damage certain surfaces.
- Surface Preparation: Before the application of any paint, cleaning the surface with an appropriate thinner can enhance adhesion and extend the durability of the paint, especially when working with surfaces like Formica.
- Cleaning Tools: Properly cleaning brushes and sprayers with the correct thinner ensures that tools remain in optimal condition for future use.
- Adjusting Viscosity: Thinners provide the flexibility to customize paint thickness, allowing for precise application based on the desired finish.
Utilizing the correct paint thinner not only streamlines the painting process but also significantly influences the final results.
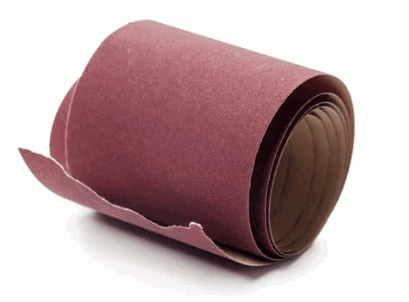
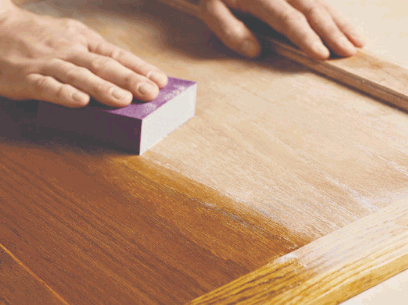
Sandpaper
Fine sandpaper is an essential material for preparing surfaces prior to spray painting, as it facilitates the creation of a smooth and even base. Using a Wagner Flexio 5000 can further enhance the precision and evenness of the spray application.
When preparing surfaces such as kitchen cabinets, sanding is a critical step that not only enhances paint adhesion but also contributes to a professional-looking finish. Proper sanding techniques remove imperfections and rough spots that, if left unaddressed, can detract from the final result. One effective method frequently employed by professionals is wet-sanding, which involves using water to lubricate the surface and minimize dust during the sanding process. This technique is instrumental in achieving an ultra-smooth finish.
The advantages of wet-sanding include:
- Minimization of the risk of scratching the surface.
- Improved visibility of flaws that require correction.
- Achievement of a finer texture that is conducive to paint application.
By understanding and implementing appropriate sanding techniques, individuals can significantly enhance the overall appearance of their cabinets, ensuring a longer-lasting paint job.
Painter’s Tape And Safety Precautions
Painter’s tape is essential for achieving clean lines and protecting areas that should not be painted, thereby ensuring a professional finish when spray painting kitchen cabinets. It is also important to follow safety precautions to protect oneself during the painting process.
Effectively utilizing this important tool not only enhances the aesthetic appeal of the project but also significantly impacts its durability. When preparing to apply painter’s tape, it is important to adhere to the following guidelines:
- Ensure that surfaces are clean and dry to facilitate optimal adhesion.
- Press down firmly along the edges to create a seal, preventing paint from seeping underneath.
- Remove the tape while the paint is still slightly wet to achieve sharper lines.
By following these recommendations, one can minimize the likelihood of paint bleed and achieve the desired crisp edges. Ultimately, the careful application and removal of painter’s tape are crucial in enhancing the overall quality of the painting project.
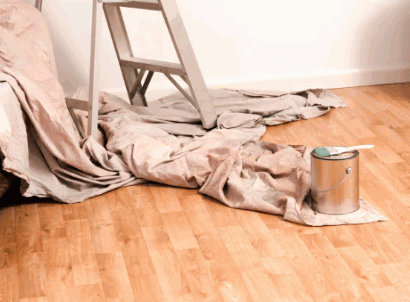
Drop Cloths
Utilizing drop cloths during the spray painting process is essential for safeguarding floors and furniture from overspray and drips, thereby facilitating an easier clean-up and maintaining an organized workspace free from paint spills that could potentially cause damage or staining.
There are various types of drop cloths available, each designed to meet specific needs and environments. When working on a DIY project like spray painting cabinets, these include:
- Canvas Drop Cloths: Highly durable and absorbent, canvas drop cloths are ideal for large projects as they can effectively contain spills without allowing paint to seep through.
- Plastic Drop Cloths: Cost-effective and easy to clean, plastic drop cloths are suitable for covering furniture and floors. However, it is important to note that they can be slippery.
- Paper Drop Cloths: Lightweight and intended for single-use, paper drop cloths offer excellent coverage while being environmentally friendly.
Regardless of the type of drop cloth selected, it is imperative to remember that employing additional protective gear such as masks and gloves is crucial for ensuring safety throughout the painting process. This added layer of protection not only shields against paint fumes but also protects the skin from accidental exposure to chemicals.
Step-by-Step Guide On How To Spray Paint Kitchen Cabinets
Spray painting kitchen cabinets entails several essential steps that are crucial for achieving a high-quality finish. The process begins with the removal of cabinet doors and a thorough cleaning of the surfaces to prepare for painting. By adhering to a systematic approach, one can effectuate a remarkable transformation of the cabinets, similar to the transformation seen in a Christmas holiday makeover.
The initial step involves detaching cabinet doors, drawer faces, and hardware to provide unobstructed access to all areas. Subsequently, it is imperative to clean the surfaces meticulously to eliminate any grease and dirt using a TSP cleaner, thereby establishing an optimal foundation for the application of primer and paint.
A light application of paint is essential to prevent drips and ensure an even coat; it is also important to allow for touch-ups as necessary to attain a flawless appearance.
Prep The Cabinets
Preparing the cabinets is a crucial initial step in the spray painting process, which entails removing doors, drawer faces, and cabinet hardware to facilitate a smooth and efficient application.
Before commencing the painting, it is essential to take the necessary precautions to protect the integrity of the kitchen. Start by carefully detaching all cabinet hardware, including knobs and hinges, using a screwdriver. This step is vital for safeguarding the hardware from paint splatters and achieving an even coating on the cabinet surfaces.
Furthermore, the importance of cleaning each surface cannot be overstated; a thorough cleaning with a degreaser will eliminate grime, grease, and dust, thereby significantly improving paint adhesion. After cleaning, it is imperative to allow the surfaces to dry completely to prevent any moisture-related issues during the painting process.
- Gather tools: screwdriver, cleaning rags, degreaser
- Remove hardware carefully
- Clean surfaces thoroughly
By completing these steps, one ensures that the cabinets are well-prepared for an exceptional new finish.
Sand And Clean The Cabinets
Sanding the cabinets with fine sandpaper is essential for creating a smooth surface, followed by cleaning with a TSP cleaner to eliminate any remaining debris and grease. Choosing high-quality sandpaper from brands like 3M can enhance the effectiveness of this step.
When undertaking a cabinet refinishing project, it is crucial to recognize that the type of sandpaper used significantly impacts the overall finish. Fine-grit sandpaper, typically ranging from 120 to 220 grit, is ideal as it smooths the wood without creating deep scratches.
To adequately prepare the surfaces, the application of TSP cleaner not only removes dirt but also ensures that the surface is free of oils, thereby enhancing paint adherence. By combining these two methods, one can achieve the following:
- A more professional-looking final result
- Increased longevity of the paint
- A smoother and more durable finish
This preparation greatly enhances the adhesion of the paint, allowing it to bond more effectively with the wood. Consequently, investing time in sanding and proper cleaning is well worth the effort to achieve a superior outcome.
Prime The Cabinets
Priming cabinets with an appropriate paint primer is essential to ensure enhanced adhesion and a more durable finish, particularly when utilizing non-flammable and topcoat primers.
There are several types of primers available, each specifically formulated to address particular needs and surface conditions. For example, oil-based primers are highly effective for blocking stains and providing a robust foundation on wood surfaces, which ultimately enhances the overall quality of the finish. Conversely, latex primers are preferred for their quick drying times and ease of cleanup, making them suitable for interior projects. Additionally, textured and specialty primers are designed to adhere to challenging surfaces such as metal or plastic, ensuring necessary adhesion where standard primers may not perform adequately.
- Stain-blocking primers are particularly effective on surfaces that have previously encountered paint-related issues.
- Furthermore, adhesion primers significantly improve the paint’s adhesion, especially on glossy surfaces.
The application of a primer prior to painting is not merely recommended; it is critical for achieving a professional-quality result. By creating a uniformly smooth layer, primers help prevent common problems such as peeling and bubbling, thereby extending the lifespan of the paint application and reducing both time and costs associated with potential future repairs.

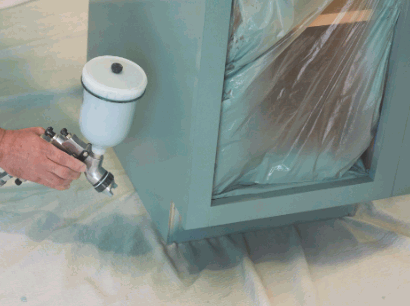
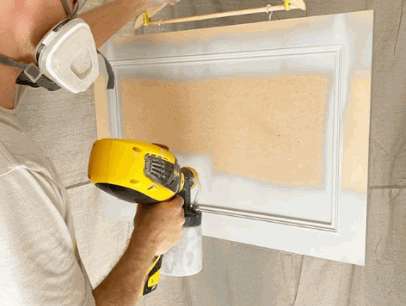
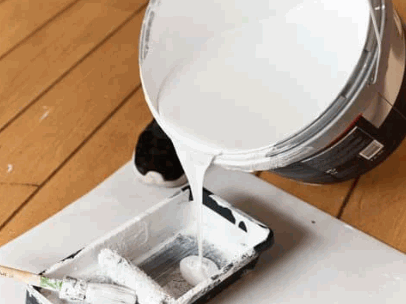
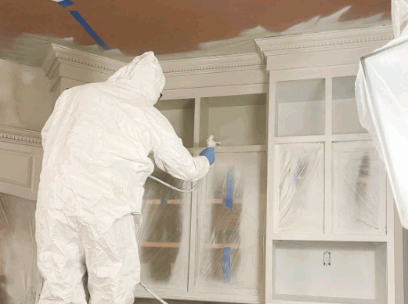
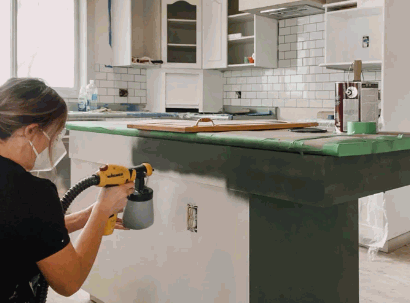
Spray Paint The Cabinets
When preparing to spray paint cabinets, it is imperative to employ light application techniques to prevent drips and to achieve an even coat of paint.
To effectively master the process of cabinet spraying, it is essential to consider both the distance from the surface and the speed of movement during application. The recommended distance is typically between 6 to 12 inches from the surface, which ensures that the paint is distributed evenly without pooling or running. Using an HVLP sprayer can help achieve this level of precision.
Maintaining a consistent speed while operating the sprayer is critical; an ideal pace is approximately 2 to 3 feet per second. The following are common mistakes to avoid:
- Failing to shake the paint thoroughly, can lead to uneven pigmentation.
- Applying paint too thickly in a single pass, results in drips and runs.
- Neglecting to perform a test spray on a scrap piece before commencing, can help identify potential issues in advance.
By adhering to these guidelines, one can transform cabinets and achieve a professional-looking finish on cabinet surfaces with minimal effort. Using tools like the Wagner Flexio 5000 can help ensure precision and efficiency in the spray-painting process.
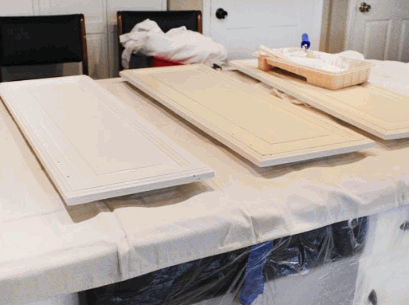
Apply A Second Coat (If Needed)
Once the initial coat has dried, it is important to evaluate the necessity of a second coat to attain the desired finish and depth of color. Don’t forget to use a TSP cleaner to prepare the surface for repainting and ensure better adhesion.
Several factors must be considered when making this determination. First, the choice of color plays a significant role in the need for an additional layer. Darker shades often require multiple applications to achieve uniformity and richness, while lighter colors may necessitate extra coverage to prevent uneven patches. Additionally, the texture of the surface is crucial; a rough or porous surface may absorb more paint, increasing the requirement for a second coat to ensure a smooth and glossy finish.
- Test Coverage: Before applying the second coat, assess how effectively the first coat has covered the area. If any underlying colors or textures remain visible, it is a clear indication that additional paint is necessary.
- Lighting: Natural light can expose imperfections that may not be apparent under indoor lighting. It is advisable to evaluate the surface under varying light conditions to ascertain whether touch-ups are needed.
- Maintain Consistency: When performing touch-ups, utilize the same brand and finish as the original coat to ensure a cohesive appearance.
Ultimately, the objective is to achieve a seamless finish that enhances the overall aesthetics of the project. Therefore, it is essential to take the time to thoughtfully assess the need for additional coats.
Let The Cabinets Dry
Allowing the cabinets to dry thoroughly is essential for achieving a durable finish, and factors such as air movement can significantly reduce drying time.
In any woodworking or DIY project, understanding the drying process is critical, as it influences not only the aesthetics but also the durability of the final product. Patience is paramount during this stage; rushing the process may result in uneven finishes or structural complications. Using an HVLP sprayer can help cut drying time significantly.
- Ensure proper ventilation in the drying area to support optimal air circulation.
- Maintain adequate spacing between the cabinets to enhance airflow and promote quicker drying.
- Consider utilizing fans to create a consistent breeze, which will aid in the efficient evaporation of moisture.
Investing the necessary time to properly cure the cabinets can lead to a more aesthetically pleasing and long-lasting finish, ultimately saving time and effort in the future.
Tips For A Successful Spray Painting Project
To achieve a successful spray painting project, it is imperative to select the appropriate paint and primer while utilizing proper techniques throughout the process.
Additionally, conducting the project in a well-ventilated area is crucial for ensuring safety.
Choose The Right Paint And Primer
Selecting the appropriate paint and primer is essential for achieving a durable and visually appealing finish, with water-based urethane and latex enamel paint being popular choices for cabinetry. Brands like Benjamin Moore and Insl-X offer excellent options for both.
In the realm of cabinetry, the effectiveness of the selected paint and primer significantly impacts not only the aesthetic appeal but also the longevity of the surface. Water-based urethane is renowned for its excellent adhesion and quick drying time, making it a preferred choice among industry professionals. Meanwhile, latex enamel paint provides vibrant color options and facilitates easy cleanup.
Utilizing high-quality primers specifically designed for cabinetry can effectively prevent peeling and chipping, ensuring an even finish. The right combination of materials enables individuals to attain a flawless appearance that harmonizes style with practicality. By investing in superior materials, one can enhance both the visual appeal and functionality of kitchen cabinetry.
Use Proper Technique
Employing proper spray painting techniques significantly influences the paint pattern and final sheen, resulting in a more professional appearance.
To achieve optimal outcomes, it is essential to focus on consistent movement during the application process. This involves maintaining a steady pace and even strokes to prevent drips and ensure uniform coverage. Maintaining a consistent distance from surfaces is also crucial; typically, a distance of 6 to 12 inches is advisable to minimize overspray and ensure even paint adhesion. Additionally, familiarizing oneself with the settings on the sprayer is beneficial, as adjusting the pressure and spray pattern can greatly enhance the final result.
The following tips should be considered:
- Test the sprayer, such as the Wagner Flexio 5000, on a scrap material before use.
- Apply multiple thin coats rather than a single heavy coat for improved control.
- Monitor for overspray and adjust your angle accordingly.
By adhering to these recommendations, the results can effectively demonstrate a polished and professional finish.
Work In A Well-Ventilated Area
Working in a well-ventilated area is essential for both the safety and the quality of the spray painting project, as it facilitates the dissipation of fumes and enhances air movement.
Ensuring adequate airflow not only reduces exposure to potentially harmful chemicals but also plays a critical role in improving the drying process of the paint. In the absence of sufficient air circulation, moisture may persist, resulting in imperfections in the finish.
Proper ventilation allows for the efficient evaporation of solvents in the paint, leading to a smoother and more durable surface. To achieve optimal ventilation, consider opening windows and doors, setting up fans, or utilizing exhaust systems to promote continuous air exchange. Recommended actions include:
- Positioning fans to direct airflow towards open spaces.
- Utilizing air purifiers equipped with activated carbon filters to remove harmful particles.
- Monitoring humidity levels in the environment to ensure optimal drying conditions.
By implementing these measures, one can effectively mitigate health risks while achieving superior results in spray painting endeavors.
Protect Surrounding Surfaces
Protecting surrounding surfaces is an essential aspect of the spray painting process, as it ensures that unintended overspray does not compromise adjacent areas. Neglecting to implement these precautions can result in costly errors, and potentially damaging furniture, floors, or walls that are not intended for paint application.
To effectively shield surfaces, the use of drop cloths is highly recommended. These protective sheets can cover extensive areas, capturing any accidental splatters or drips that may occur during the spraying process. Additionally, utilizing masking tape is crucial for securing the edges of these coverings and for protecting specific lines or shapes that need to remain untouched.
- Drop Cloths: Utilize canvas or plastic sheets to safeguard floors and furniture.
- Masking Tape: Ideal for covering edges and ensuring clean lines.
- Protective Gear: Always wear a mask, goggles, and gloves to protect against inhalation and skin irritation.
By adhering to these practices, not only is the workspace maintained in a clean condition, but the risk of unwanted paint on surrounding surfaces is significantly reduced.
Take Your Time And Be Patient
Taking the necessary time and exercising patience during the spray-painting process is essential for achieving optimal results and minimizing errors. Whether you’re preparing for a Moen faucet installation or during the Christmas holiday, careful planning is key.
Rushing through any phase can result in uneven coverage or drips, ultimately detracting from the overall appearance of the project. When undertaking a spray painting endeavor, it is crucial to approach the task thoughtfully, and meticulously following each step outlined in the preparation phase. This includes selecting the appropriate type of paint and ensuring a suitable environment for the work. Allowing adequate drying time between applications is critical for achieving a polished, professional finish.
- Ensure that you work in a well-ventilated area to facilitate quicker drying.
- Consider applying multiple thin layers instead of one thick coat.
- Always adhere to the manufacturer’s instructions to achieve the best results.
By following these guidelines, one establishes a foundation for a successful outcome that exemplifies dedication and attention to detail.