Are you considering a stylish yet practical flooring option for your kitchen? A resin floor might just be the perfect solution.
Known for its durability and easy maintenance, resin flooring offers a seamless finish that can elevate any space.
This article explores the benefits of installing a resin floor in your kitchen, guides you through the step-by-step installation process, and lists the essential tools and materials needed.
Get ready to transform your kitchen with this modern flooring choice!

What Is A Resin Floor?
A resin floor is a modern flooring solution that utilizes materials such as epoxy resin, polyurethane resin, or methyl methacrylate (MMA) resin to create a seamless finish, providing a high-quality and durable surface suitable for various applications, including kitchens, commercial settings, and industrial environments. These floors are known for their waterproof and impact-resistant properties, making them an ideal choice for high-traffic areas where longevity and aesthetic appeal are crucial.

What Are The Benefits Of Installing A Resin Floor In My Kitchen?
Installing a resin floor in your kitchen offers numerous benefits, making it an attractive option for homeowners and commercial kitchens alike. These benefits include exceptional durability, easy maintenance, and aesthetic appeal, allowing for a high-quality surface that is waterproof and resistant to impacts and chemicals, ensuring long-lasting performance even in high-traffic areas.
Gain insights: Is Epoxy Flooring Good For Homes
Durable And Long-lasting
Resin floors are renowned for their durability, making them a long-lasting solution for various environments, especially in kitchens that experience high traffic and frequent use.
Their impact resistance and abrasion resistance ensure they can withstand heavy foot traffic and the rigors of daily activities without significant wear and tear.
This resilience is further enhanced by the high-quality materials used in their composition, which not only contribute to their strength but also create a seamless surface that hinders the accumulation of dirt and bacteria, promoting a healthier environment. Resin floors are resistant to staining and chemical damage, making them an ideal choice for both residential and commercial settings.
- Impact resistance allows them to endure the dropping of heavy items without cracking or breaking.
- With their abrasion resistance, these floors maintain their aesthetic appeal even under the stress of heavy equipment and foot traffic.
As a result, it’s evident that choosing resin floors means investing in a surface designed to last and perform efficiently in any high-use area.
Easy To Clean And Maintain
One of the standout features of resin floors is their easy maintenance, which is essential for keeping kitchens hygienic and visually appealing. Cleaning resin floors typically requires just a simple mop and sweep, along with the occasional use of a gentle cleaning solution or neutral pH detergent to tackle stubborn stains, ensuring a clean and polished surface.
This effortless upkeep not only preserves the aesthetic quality of the flooring but also significantly contributes to its longevity.
Regular maintenance can be achieved with minimal time investment, as one can simply use a microfiber mop or cloth for quick touch-ups. For deeper cleaning, a mixture of water and a low-abrasive cleaner works wonders without compromising the resin’s integrity. It’s advisable to avoid harsh chemicals, as they can lead to deterioration over time.
- Utilizing non-toxic, eco-friendly products ensures safety for both individuals and the environment.
- This type of flooring is resistant to stains and spills, making it a popular choice in high-traffic areas like kitchens.
The result is a surface that remains not only shiny and fresh but also adheres to high sanitation standards, reducing the risk of bacteria buildup.
Resistant To Stains And Chemicals
Resin floors are notably resistant to stains and chemicals, making them highly suitable for kitchens where spills and messes are commonplace. This waterproof property not only protects the floor from moisture but also simplifies maintenance by preventing stains from setting in.
Along with their durability, the chemical resistance of resin floors ensures that common kitchen substances, from acidic sauces to oil-based ingredients, do not compromise the flooring’s integrity. This quality is crucial in busy culinary spaces where the risk of spillages is elevated.
The versatility of these surfaces allows for easy cleaning without the fear of damaging the material, which is often a concern with traditional flooring options.
- Stain-resistant properties lead to improved hygiene, minimizing bacterial growth.
- Easy to repair if damages occur, ensuring longevity and aesthetic appeal.
- A variety of designs is available, allowing homeowners to customize their kitchen while maintaining functionality.
Ultimately, the combination of these features makes resin floors an exceptional choice for anyone looking to create a safe, practical, and visually appealing kitchen environment.

Customizable Design Options
Resin floors offer customizable design options, allowing homeowners to create a unique aesthetic appeal that fits their kitchen decor.
With a variety of colors, finishes, and patterns available, a resin floor can achieve a high-end appearance that enhances the overall visual appeal of the space.
By considering the wide array of choices available, individuals can opt for striking colors that reflect their personal style, from bold shades to soft pastels. Additional options include unique patterns such as flakes, metallics, or even a classic solid finish, catering to a range of design preferences.
- Colors: A spectrum spanning from vibrant hues to muted tones.
- Patterns: Innovative designs like geometric shapes or flowing marbles.
- Finishes: Glossy, matte or even textured finishes can add depth to the look.
This level of customization not only elevates the ambiance but also increases the floor’s durability, making it a practical choice for high-traffic areas without sacrificing design flair.
What Are The Steps To Install A Resin Floor In My Kitchen?
Installing a resin floor in your kitchen involves several crucial steps to ensure a successful outcome, starting from surface preparation to the final curing process. This comprehensive guide will walk you through each phase, including gathering the necessary tools and materials such as a trowel, mixing paddle, and spike roller, to achieve a seamless application that meets all safety precautions.
Step 1: Preparation And Planning
The first step in installing a resin floor is thorough preparation and planning, which is vital for achieving a smooth surface level and ensuring the longevity of the floor. This involves assessing the area, gathering necessary tools and materials, and creating a detailed plan for the installation process.
Before undertaking this exciting renovation, it’s important to begin with a careful assessment of the current floor. Observe any existing imperfections that may affect the resin application.
Following this, take precise measurements of the space, as accurate dimensions are crucial for successful installation. Review your findings and compile a comprehensive list of required tools and materials to ensure efficiency.
Essential tools may include:
- Resin mixing container
- Control roller
- Spreader
- Protective gloves and eyewear
With all the necessary items in hand, you can move forward, knowing that a well-prepared kitchen area sets the foundation for a stunning resin floor.
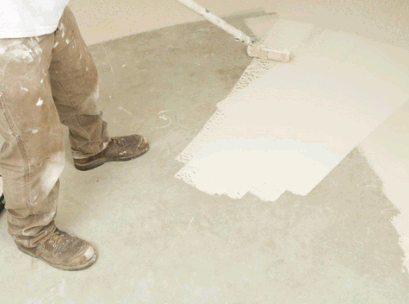
Step 2: Surface Preparation
Surface preparation is a critical step that ensures the resin adheres properly and performs well, which includes grinding and cleaning the floor to remove any contaminants or existing coatings. Proper priming is also essential to create an optimal bonding surface for the resin.
To achieve the best results, contractors recommend several surface preparation techniques that significantly enhance adhesion. One of the most effective methods is floor grinding, which not only levels the surface but also creates micro-textures that promote better resin bonding.
Following the grinding process, thorough cleaning becomes paramount; any dust, dirt, or oil residues must be eliminated to prevent adhesion failures.
Common cleaning agents can include alkaline or solvent-based solutions, depending on the contaminants present. After cleaning, the next step involves priming the surface with a suitable resin primer that fills in cracks and enhances the overall surface profile. This combination of grinding, cleaning, and priming is vital in ensuring a long-lasting and durable resin floor.
- Grinding: Leveling and texturing the substrate.
- Cleaning: Removing contaminants and debris.
- Priming: Preparing the surface for optimal adhesion.
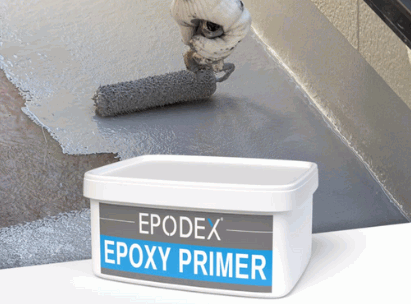
Step 3: Primer Application
After surface preparation, the next step is the application of a primer, which acts as an adhesive layer between the substrate and the resin. This process is vital for ensuring a strong bond and proper curing of the resin floor.
The importance of applying a primer cannot be overstated, as it plays a crucial role in the longevity and performance of the resin flooring system. To achieve optimal adhesion, it is essential that the primer is applied evenly, ensuring full coverage over the substrate.
- Thoroughly inspect the surface to ensure it is free of dust, oil, or moisture before primer application.
- Utilize a roller or brush for uniform distribution, as these tools help avoid any missed spots that could compromise adhesion.
- Allow the primer to cure properly according to the manufacturer’s guidelines to create a robust bond.
By taking these steps, not only does the primer enhance the overall durability of the resin floor, but it also contributes significantly to the aesthetic appeal and functional performance of the installation.
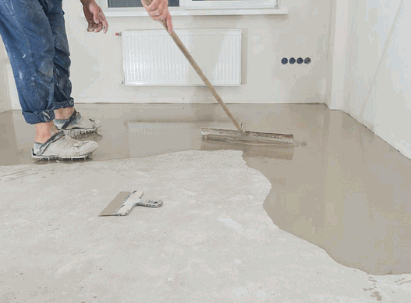
Step 4: Mixing And Pouring The Resin
Mixing and pouring the resin is a vital step where a resin mixture is carefully prepared according to the manufacturer’s instructions, ensuring the correct ratio of resin to hardener for optimal performance.
To achieve the best results, it is essential to measure the components accurately, as even slight deviations can affect the curing process.
Begin by following the specific mixing instructions laid out by the manufacturer, which often provide precise ratios that must be adhered to, typically found on the product label.
After mixing, the resin should have a uniform consistency without any lumps, indicating proper integration of the hardener.
When it comes time to pour, utilize tools such as a trowel or spatula to evenly distribute the mixture across the prepared surface.
Remember to work quickly, as the resin has a limited open time before it begins to set.

Step 5: Spreading And Leveling The Resin
Once the resin is poured, spreading and leveling the mixture is crucial to achieving a uniform and smooth surface. This can be accomplished using a trowel for precise application and a spike roller to remove air bubbles and ensure proper leveling.
To effectively spread the resin, one should consider the layout of the area, as it may require multiple passes to ensure an even coat.
Using a trowel, the applicator can glide the resin effortlessly across the surface, adjusting the angle for a consistent thickness.
- It’s essential to work quickly to avoid the resin curing before reaching all areas.
- The spike roller plays a vital role not only in bubble removal but also in spreading the material effectively.
- Having a paintbrush on hand can help with the corners and edges to ensure every part is covered.
Following these techniques will enhance the durability and appearance of the final result.

Step 6: Adding Decorative Elements (Optional)
For those looking to enhance the aesthetic appeal of their resin floor, adding decorative elements can be a fun and customizable option. This may include color flakes, pigments, or patterns that can elevate the overall design and visual appeal of the finished floor.
By choosing from a variety of options, one can truly personalize their space. Color flakes come in various sizes and shades, allowing the homeowner to create a unique blend that complements the surroundings. Metallic pigments can provide a striking shimmer, while geometric patterns offer a contemporary touch. Some might even opt for sparkle additives to give their floor an eye-catching allure. These choices not only enhance beauty but also reflect individual style.
- Customization Options:
- Color flakes in varying sizes
- Metallic and pearlescent pigments
- Geometric or organic patterns
- Glitter or sparkle additives
Investing time in selecting the right decorative elements can result in a stunning foundation for any room.
Step 7: Curing And Finishing
The final step in the resin floor installation process is curing, which is critical for achieving long-term performance and durability. After the resin has been set, a topcoat may be applied to enhance the floor’s appearance and provide additional protection against wear and tear.
Curing is not just a mere formality; it plays a pivotal role in ensuring that the resin adheres effectively to the substrate and solidifies properly. This process involves allowing the resin to reach its optimum hardness and strength, which can significantly impact the overall lifespan of the floor. The importance of this stage cannot be overstated, as proper curing can prevent issues like cracking, bubbling, or peeling over time.
- During this phase, the environment, such as temperature and humidity, should be closely monitored.
- Once the curing is complete, applying a topcoat is essential for elevating the floor’s visual appeal.
- This additional layer serves as a shield against various potential damages, including scratches and stains.
Investing time in both curing and finishing ensures a resilient and aesthetically pleasing resin floor that can withstand heavy foot traffic and challenging conditions.
What Tools And Materials Do I Need To Install A Resin Floor?
To successfully install a resin floor, having the right tools and materials is essential for a seamless application and optimal results. Key items include a resin kit, floor grinder, mixing paddle, trowel, paint roller, and spike roller, along with proper safety precautions to ensure a safe working environment.
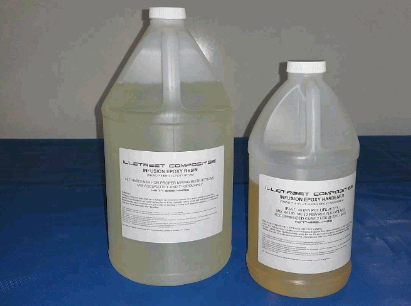
Epoxy Resin And Hardener
The primary component of a resin floor installation is the epoxy resin and hardener, which together form a durable and long-lasting surface. These materials are typically included in a resin kit and must be mixed in the correct ratio for optimal performance.
When the epoxy resin and hardener combine, they initiate a chemical reaction that leads to the creation of a robust layer, capable of withstanding heavy foot traffic and impacts. This mixture not only enhances the aesthetic appeal of the floor but also ensures superior resistance to stains, chemicals, and moisture, making it an ideal choice for both residential and commercial applications.
Therefore, it’s crucial to understand the importance of proper mixing; any deviation from the recommended ratio can compromise the integrity and durability of the final installation.
- High resistance to wear and tear
- Easy maintenance and cleaning
- Versatile design options are available
Investing in quality epoxy products is essential to achieve a resilient floor that lasts for years, thus safeguarding the value of the space where it is installed.
Primer
A primer is a crucial component in the resin floor installation process, as it provides adhesion between the substrate and the resin layer, ensuring a successful bond. Selecting the right primer is vital for the overall durability and performance of the resin floor.
The role of primer extends beyond merely promoting adhesion; it also significantly influences the longevity and wear resistance of the flooring. When applied correctly, it acts as a barrier that prevents moisture from seeping through, which can compromise the integrity of the resin layer.
A suitable primer contributes to a smooth and even surface, enabling the resin to cure effectively. Among various types available, choosing one that aligns with the specific conditions of the substrate ensures optimal results. Proper preparation and application of the right primer bolster the resilience of the floor, making it resistant to abrasions and chemical spills.
- Improved adhesion
- Moisture barrier
- Enhanced durability
- Surface smoothing
Primer serves as the foundation for achieving a successful and long-lasting resin floor.
Spiked Shoes
Spiked shoes are an important tool for installing a resin floor, as they allow for safe and effective movement across the fresh resin surface during application. These shoes enable installers to walk on the wet resin without disturbing its consistency, ensuring an even and flawless finish.
Utilizing spiked shoes during the installation process is vital for maintaining the integrity of the resin floor, as they distribute the weight of the installer effectively and prevent unwanted imprints or defects on the surface. With their unique design, spiked shoes provide traction that aids in preventing slips while also allowing for necessary adjustments and touch-ups without compromising the setting resin. This careful attention to detail not only facilitates a smoother application but also enhances the overall durability of the final product.
When investing in a resin flooring project, considering the right footwear can significantly impact the quality and longevity of the surface.
- Weight distribution: Prevents dents and marks
- Enhanced traction: Reduces slip risk
- Surface integrity: Maintains resin consistency

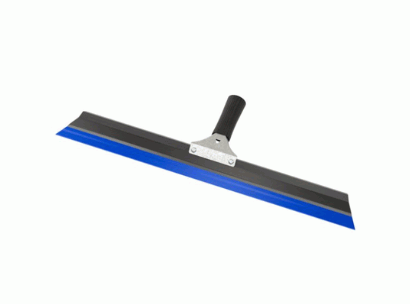
Trowel Or Squeegee
A trowel or squeegee is essential for spreading and leveling the resin during installation, helping to achieve a smooth and even surface. Choosing the correct type of trowel based on the desired finish is crucial for the final appearance of the resin floor.
The tool not only ensures that the resin is uniformly distributed but also aids in eliminating air bubbles, which can compromise the structural integrity and aesthetic appeal of the surface.
- When using a trowel, the user can create finishes that range from glossy and reflective to textured and matte, catering to various design preferences.
- A high-quality squeegee, on the other hand, assists in managing larger areas efficiently, ensuring the resin flows smoothly without leaving behind inconsistencies.
The effectiveness of both tools significantly influences the durability and longevity of the floor, contributing to a seamless application that embodies both functionality and style.
Paintbrush Or Roller
A paintbrush or roller is utilized for applying a uniform topcoat to the resin floor, enhancing its appearance and providing additional protection against wear and tear. Selecting the right tool for application ensures a smooth and professional finish.
When considering the application of the topcoat, the choice between a paintbrush and a roller can significantly influence the overall outcome. Both tools serve distinct purposes, yet their effectiveness lies in their execution. A paintbrush allows for precision, enabling the user to reach corners and edges with ease, while a roller covers larger areas more rapidly, resulting in a more efficient application.
Using the appropriate tool impacts not just the visual aesthetics but also the durability of the finish. For optimal results, ensure that the selected brush or roller is compatible with the resin’s formulation, as this facilitates better adhesion and a longer-lasting surface.
- Brush: Ideal for intricate details.
- Roller: Best for expansive, flat surfaces.
A well-executed application not only enhances the beauty of the resin floor but also provides a tough protective layer that withstands daily wear.